
Quick overview:
PC-Rechner werden oftmals von vielen Benutzern verwendet, die unterschiedliche Ansprüche und Gewohnheiten haben. Besonders die Auflösung ist nicht nur Geschmackssache sondern hängt auch mit der Kompatibilität verschiedener Programme zusammen.
Many users prefer the resolution 1024x768 for better readability and (depending on the monitor type) thanks to higher refresh rates, while many choose 1280x1024, which increases the overview. However, software (such as children's programs) also require their own mode (such as 640x480) in order to function correctly. My recommendation Resolution Changer is dedicated to both cases: With a little trick, you can not only select a separate resolution for each user but also change the resolution by double-clicking, start an application and reset the resolution again after the program ends. And this is how the Resolution Changer (resolution switcher) works:
1. Click on this link to download ResChange. The file is only 48 KB in size!
2. Move these, for example, to the path you created yourself C:\Programme\ ResChange.
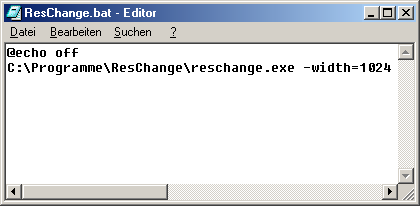
3. Now right-click on the desktop and select New/text file. Name this e.g. ResChange Aufruf and open it. Now type in the following command string:
@echo off
C:\Program Files\ResChange\reschange.exe -width=1024 -height=768 -depth=32 -refresh=60 C:\Program Files\DIRECTX\SETUP\dxinfo.exe (Without quotation marks)
Now save this file under the file name ResChange.bat after you have made an entry under File/Save as... under File type, select the entry All files.
Explanation:
- @echo off specifies that no output should appear. Otherwise you would have to click away a DOS window containing your command each time.
- First, call Reschange.exe, whereby special letters such as ä and spaces in the path specification such as C:\My programs are not permitted.
-width = Bildschirmbreite in Pixel wie z.B. 640, 800, 1024, 1280, 1600.
-height = Bildschirmhöhe wie z.B. 480, 600, 768, 1024, 1200
-depth = Farbtiefe in Bit wie z.B. 8 (256 Farben), 16, 24 und 32.
-refresh = Bildwiederholfrequnz (Hertz) wie z.B. 60, 70, 72, 75, 85, 90, 100, 120
- Zu guter Letzt kommt noch der Aufrufparameter für ein weiteres Programm wie z.B. dxinfo.exe, was in unserem Beispiel mit einer Auflösung von 1024x768, 32 Bit Farbtiefe und einer Bildwiederholfrequenz von 60 Hertz gestartet wird. Nach dem Beenden des Tools wird die Auflösung wieder zurückgesetzt. Sollten Sie hier kein Programm spezifizieren wird die Auflösung direkt aktualisiert und erst wieder nach eigenem Belieben zurückgesetzt. Und hier liegt auch gleich der Schlüssel zur individuellen Auflösungsfestlegung für verschiedene Benutzer. Windows 2000 unterstützt verschiedene Auflösung für jeden Benutzer, wobei dies nicht in allen Fällen einwandfrei funktioniert. Mit ResChange.exe sind Sie auf der sicheren Seite:
Log in under the desired user name and move the ResChange.bat to the Autostart folder under Start/Programs. When the system starts or after entering the user name and password, this file is executed and the system automatically switches to the desired resolution. Now that you know how to change the resolution, you can give all users different resolutions.
If the arrangement of the icons on the desktop changes due to the resolution change, this problem can be solved with the program "Save my Desktop" (for all Windows versions). You can get the file (257 kb) here at PCWorld.com. It saves the current arrangement of the icons and restores them if necessary!
Wichtig: Achten Sie immer darauf, dass Ihr Monitor die eingetippte Auflösung, Farbtiefe und Bildwiederholfrequenz unterstützt, damit keinerlei Schäden entstehen können (besonders bei älteren Monitoren ist dies eine gefährliche Sache). Werfen Sie dazu immer einen Blick ins Handbuch oder auf die Herstellerseite des Monitors - generell gilt: Alle Auflösungen und Farbtiefen, die Sie in den Anzeigeeigenschaften unter Systemsteuerung/Anzeige/Einstellungen finden und alle Bildwiederholfrequenzeinträge, die weiterhin unter Erweitert/Monitorzu finden sind, können Sie auch benutzen.
NOTE FOR NEW PUBLICATION: This article was produced by Sandro Villinger and comes from the Windows Tweaks archive, which has been built up since the late 1990s.

On Windows Tweaks you will find time-saving tech guides for PC, software & Microsoft. For a stress-free digital everyday life. Already We have been tweaking Windows since 1998 and just don't stop!
